Thursday, 17 August 2017

Exclusive List of Websites & Directories To Submit Your Blog

Exclusive List of Websites & Directories To Submit Your Blog
Here is an exclusive list of Websites, directory and places where you should submit your blog. Most of the sites listed here are free, and if you are creating a new blog/Website or have not submitted your existing Website to these places, you should go ahead and create one.
This also includes many social networking site and social bookmarking profile. It’s not an extensive list like 1000 sites or something, but I’m creating a list of those sites which are important and will be helpful in either search engine ranking or tracking your site report.


Submit your Website

Where to submit your Blog?

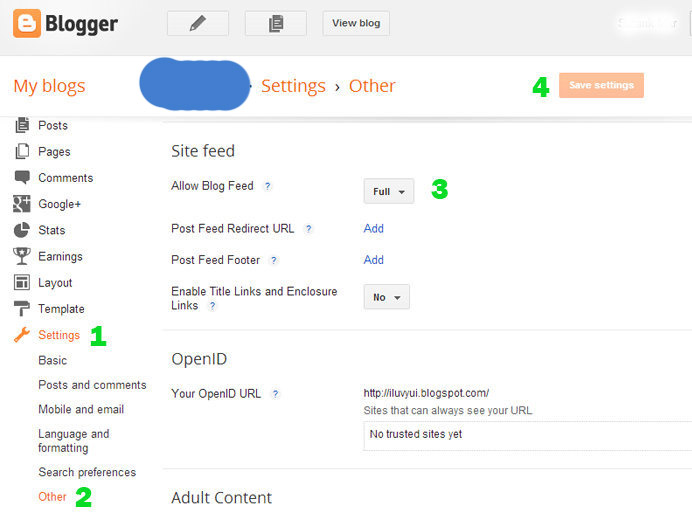
Let me start the list with Webmaster tools as it will be first step to get your site on search engines. Submitting you blog to other sites will help in better indexing and crawling of your blog. Especially when you create a new blog, it takes time for search engine bots to find your blog and crawl it, by submitting your site to these Websites which is listed below, it will help in faster indexing. Though if your sole motto is to let your site index in no time, here is a quick guide : How to index your site in 24 hours.

I’m not adding those directories or sites, which asks you to place a link back to verify the site ownership, as it will be considered as two way link exchange. Though, there are few directories which are quite useful and you may consider adding the link for a day or two just for the verification.
Many of these sites like Alltop requires you to have feed on your blog, so I recommend you to burn your feed using Feedburner before you get started.

Google Webmaster tool:
This is an official tool by Google, where you can not only add your Website but also submit your sitemap to Google. This will ensure, Google will quickly crawl all your links and index them. More over, GWT works as free SEO tool for your website. You can apply various SEO techniques using GWT data
.
Bing Webmaster tool:
Official Webmaster tool by Bing, and like Google tool, submitting your blog to this place will ensure your site is visible in Bing. Learn how to submit website to bing webmaster tools, and how to use bing webmaster tool.

Facebook:
Facebook could be huge for your blog traffic if you do the marketing right. To submit your Website to Facebook, you need to create a Facebook fan page, and that’s how you start. Simple and easy.

Google plus:
Like Fb, we can create Google plus page for our blog or Website, and this works as the starting point of your blog footprint on Google plus. Learn how to create a Google Plus page for your blog.

Twitter:
Twitter is one of the famous micro-blogging and social networking site. I already discussed why your Website needs an official Twitter account and having a profile on Twitter for your blog, will help you to get a free link. Though it will no follow, again it’s very useful for blog branding. Learn how to create a Twitter profile.
Ahrefs:
ahrefs

This is a site to measure your blog backlink, and a free account will let you monitor one complete site. Simply go ahead, register a free account and under reports > add the new domain. Add your blog and verify your ownership. Now, Ahrefs will help you to keep a track of links to your site. Very useful if you understand the importance of backlinks. Link: Ahrefs
Google Analytics:
Not a typical place to submit your blog but very useful to keep a track of your site stats and the best part is it’s free stats tool by Google. Highly recommended for a new site to add GA on your blog.

BlogCatalog:
Blogcatalog is one of my favorite Web directories to submit a Website. They manually accept or reject a blog submission, so make sure your site have enough content before you submit here. Also, while adding your blog, take care of proper category. Link: BC
Alltop:
Not for new blogs, but if you have a quality blog, make sure you add your blog to Alltop. Very useful for giving good exposure to your site.  Requires you to create a free account before submission. Link to submit
Pinterest:
Pinterest is a popular image-based social networking site. When you submit your blog to Pinterest and verify your profile, you earn a free high-quality backlink. More over, it will help in improving your online brand presence. Join Pinterest.
IMT Website submitter:
IMT Website submitter
This is an online tool, which submits your Website to over 3000 places. For example, sites which stores site analytics, site price and so on. Those links might not be very high quality, but it will help in quick indexing, and improving backlink profile of your blog. Link
If you like slides, you can use this slide on your blog or for your team:
This is a quick list for now, and I will keep updating the list with time. For now, I hope this list will be helpful for your new blog to get started online. If you know more Websites, which will be useful for any new blog, and we should submit our blog there, let me know via comments.

Tuesday, 15 August 2017

Best Way To Create an Animated Intro Video in 90 Minutes: DIY

Best Way To Create an Animated Intro Video in 90 Minutes: DIY
Create Animated Intro Video

Animated intro videos work great for online video advertising & you already know that how popular these kind of videos are on social-media sites. None the less, they help your target customer to learn & understand about your product without getting bored.
I managed to find a local video production house which was charging close to $1000 for sketching the video story board and for final video production. We worked for almost six days on the iteration of our product storyline, and later we handed the storyline over to the video production team.


Now, not everyone can afford $1000 for a video, (and this is the lowest price we could find). A reputable company will charge as much as $5000 for creating these types of videos, and any start-up or small business company will likely be unable to put this much money into video production, especially since they also need to spend additional money marketing the video.
Enter MakeWebVideo, which recently caught my eye as a great solution for creating animated story-telling videos on a budget.
In this article, we will look at how MakeWebVideo works, and how you can make animated intro videos for your product using this DIY tool.

MakeWebVideo features and how it works:

Let me start by sharing the most important features of the MakeWebVideo service, and explain how it works.
MakeWebVideo lets you create free explanatory videos for your product or service using their free pre-defined video templates. All you need to do is select any video (they offer a variety of free templates), and you can edit the text, graphics and music to suit your taste and needs. The best part is that you don’t need any advanced editing skills.  Anyone (yes, anyone!) can make a good video using this tool. I will demonstrate this in the next section, but first let’s have a quick look at the notable features of this service.
  • Free to join and you can create videos for free. Only when you are satisfied with the video to the extent that you wish to buy it do you pay for the final product. With prices as low as $88, you can create attractive and interesting videos for your service or product.
  • Select a template from a wide range of video templates provided (whiteboard video templates, story-telling templates, demo product templates).
  • No technical skills required to make the videos.
  • You can choose your graphics, text, and even music.
  • There is no limit for editing your preview video, and you pay only when you are satisfied with the video and are ready to download it.
  • You can use MakeWebVideo to host your video as well. Just copy the video embed code, and use it to display the video on your webpage.
Over all, MakeWebVideo is a power-packed web service for small businesses and individuals, with all the features you need to make animation videos for the promotion of your product or service, and you can create a video within less than 90 minutes.

How to make an animated video for your product:

I contacted the MakeWebVideo team for a review account, and to my surprise, their CEO (Mario Gomes Cavalcanti) replied within 30 minutes offering me $99 to try out their service.
Let me show you how you can create a video for your product or service using their self-service platform.
One of the best parts of this service is the fact that even if you are not ready to spend money on a video, you can spend a little time grabbing a template, editing it according to your needs, and checking out your creativity abilities. This also allows you to see (with zero financial investment) what kind of videos you can create using this service.
If you create something that might help boost your sales, you can pay later to download your video. Otherwise, simply use it as a tool for learning while not paying anything to have done so!
  • Head over to the MakeWebVideo website and create a free account.
  • Now select from any pre-defined video template. You can hover over the videos to play the videos, and select one which suits your needs.
Anitmated video templates
  • Click on “create free preview video”, and you will be taken to the video production studio. Don’t forget to check out the tutorial video at the bottom, which will make your work much easier.
Video production studio
  • Now all you need to do is change the video text, graphics and audio. In most cases all you need to do is change the text and graphics at certain places to reflect your brand.
Make video online
The whole process is very easy, and you will be able to produce a professional looking web video in 75 minutes, (an additional 15 minutes or so is required for final touch-up and downloading if you want to purchase your video).
I have created a video for this review, but before you check out the video, here are a few helpful tips:
  • Work on creating good copywriting for the video text. There are pre-defined templates, but you should use a normal notepad to write down your copy (the text for your video). If you are not a good copywriter, you can hire one online which will not cost a lot and will help you to create the perfect intro video for your product or service.
  • Make sure to use the HQ images in proper size.
  • Don’t rush into producing the video. Make sure to review and edit when necessary.
  • You can hire someone online to do a voice-over for you that will make your video more catchy.
  •  
  • Overall, MakeWebVideo is an excellent solution for Entrepreneurs and small businesses wishing to create a professional-looking animated intro video for their product or service for the little cost. This is a recent start-up which I believe will be very beneficial to small business owners
    .
    Check out MakeWebVideo
    Let me know your thoughts about this video and about the web service used to create it. An alternative to MakeWebVideo is Powtoon which is also worth looking at.
    And as always, feel free to share this post with your entrepreneurs and friends via Facebook, Twitter and Google Plus.
     

How to Turn Your Blog Into A Popular Brand In 2017

How to Turn Your Blog Into A Popular Brand In 2017
Turn Blog Into A Popular Brand
A brand is a very complex notion and, nowadays, it has become a used word, both in the online and offline world. To clearly delimitate the meanings of the word “brand”, a lot of good specialists have written a multitude of thick books while others have dedicated entire blogs to the subject so it’s somehow unappreciative to write only a few phrases about it.

 A brand, for the common use, is an entity that, built along time, has become the symbol of something which is regarded by the public as a provider of quality, trust or efficiency. More pragmatically, the brand is the one that makes a buyer choose a product made by the company even if it is expensive (and sometimes more expensive than a similar one).


The Internet has benefitted from a tremendous evolution and it was only normal for the idea of the brand to be presented here; the idea of developing a brand for a blog is almost a novelty, however could it be a worthy idea? As a personal opinion, I am sure that it was implemented, as there are some blogs which are treated as being real authorities and these posts are enjoyed by a huge numbers of readers. An elitist blog is a good source of uncountable days of no break for the admin, but it could be regarded as a financial opportunity. So, how to make a brand for a blog?
First of all, we should assume that this is a never ending process so patience is the main fuel in this perpetual trying, but there are more to add to the perfect recipe:

6 Tips to Make your Blog “A Brand”

1. Establish a clear path to follow

Make a Brand
To be a real authority, a blog should establish a clear field and a patent of posting; a mixture of subjects and forms of posting isn’t a sign of professionalism so it’s hard to become a brand in such a context.
On the other hand, don’t go to the opposite extremity, it’s normal to ensure a good variety of subjects, but it’s better to have small connections, for example a blog about web design could contain posts about development, freelancing or even blogging, but it’s unjustified to write about math or physics. The schedule of posting has a pretty important influence on the overall construction of a brand; it is a must, for the progress of a blog, to have regular readers who know the frequency of the posts. I know this is hard but most of the well known bloggers consider that daily posting is the best ratio, not too much to annoy the readers, not too little to make the audience forget about the respective blog.

2. The posts should be high quality and interesting
At the first point, I emphasized that the readers should be kept up-to-date with your frequency of posting so as to be back on the blog and enjoy the latest articles, but they should have a reason to do that. Definitely the main ingredient of this coming back is the quality of the posts; we are all lacking the time, so why would someone want to waste his time for postings of inferior quality?A good solution to attract more and more readers is to have impressive giveaways and very interesting subjects; in this way, an undecided surfer could land on your page only to compete for a gadget or a book, but he can notice that the blog is very good and from now on, he may come back regularly to check the latest articles.

3. Become an authority in your Niche

Become authority

I hope that it was obvious, from the start of this list, that all my tips are only the chapters from a coherent policy of self-promoting and the final result is gaining the respect as a brand so everything is interconnected. Probably, the middle way between an ignorable blog and a brand, is the status of authority. The majority of the specialists consider that an authority is recognized and respected only by the people who activate in the domain while a brand is universally recognized. The natural way to grow and develop is to firstly turn into an authority; all the people in the respective niche should see you as a dominant opinion.

4. Communicate with people
A good communication with the readers is the perfect method to maintain a well known blog. I know that we are living in the world of speed, social media, but still the world of mouth has its influence so don’t ignore it. We never should ignore that the common people are the ones who truly built a brand; if the people aren’t sure that you are the best solution, then there is still much to work out.

5. Be distinctive and original

Distinguish and Unique Brand
A branded blog needs to be distinctive – it is much more than a simple requirement, it is an imperative of survival. Think of this: we can find tons of T-shirts at the mall and many of them look pretty similar, but there is almost no buyer who doesn’t recognize the swoosh of Nike and buys such T-shirts. A lot of people prefer buying high quality products and the little logo of Nike is the guarantee of it; in this case the swoosh makes the big difference and the huge company is truly a brand.
In our example Nike was original and distinctive due to the logo – people noticed that they make good clothes and recognized them with the help of logo. The same process should be done with the blog; people should be aware that when they see your logo or hear your address, it should be something interesting, deserving a click.
Along with this, try to get a custom theme or design for your blog, because that will give your blog a unique identity. Look Socialmediaexaminer, WPHostingDiscount for an example.
6. (Optional) Hire a specialist/ team of specialists in branding
It really depends on the budget and the personal aspirations; a blog which is respectable has a huge numbers of readers and many posts which are difficult to be handled by a single person. When we are in this situation, the best solution is to hire someone who really knows how to promote the blog, usually a single major error is enough to have a drop down in traffic and surely it is a step back in the course of becoming a brand.

Best 5 Content Marketing Hacks For Attracting More Website Visitors (Plus Clients)

Best 5 Content Marketing Hacks For Attracting More Website Visitors (Plus Clients)
 Content Marketing Hacks For Attracting Visitors & Clients

Every website owner probably wants more traffic coming into their site. I shouldn’t have to repeat the cliché that “traffic is the lifeblood of any blog”… I’m sure you already know that.
This is because you won’t get more clients without more traffic. It’s only when you’re able to bring people to your website that you will have the chance to convert them into customers.


In other words…
  • More traffic = More customers = More money
Does that make sense?
That said, if more website traffic has been your problem all this time, I want you to bring your seat closer as I’m about to unveil to you some great ideas you can use to attract more traffic to your website.
I want you to understand that there are many ways you can drive traffic to your site, but today, we’re going to talk about five ways you can hack content marketing to increase traffic.

5 Content Marketing Hacks for Attracting More Website Visitors

1. Come Up With Viral Content Ideas
First of all, you have to understand why certain content goes viral while others don’t. Once you’ve figured this out, it will become easier for you to adapt to what works.
According to Jonah Berger, an associate professor of marketing, Wharton School, useful and practical content that arouses emotion gets shared the most.
Emotions that make online content go viral

Gone are the days when all you needed to do was create content that appealed to Google alone. If you want to remain relevant in your industry today, your primary focus should be on your readers.

The search engines can come later.
It pays more to focus on valuable and emotionally driven content that your audience will highly benefit from. Once you’re able to achieve this, they will help spread the word about it.
You may not necessarily succeed at having viral ideas each time, but nailing it once in a while will go a long way in enhancing your website’s traffic and getting more clients.
To help you in your viral content idea brainstorming, provide an answer to the following questions:
  • Do you know of any trending idea that people will find interesting?
  • Is the idea funny? Can it be made funny?
  • Is your idea capable of arousing controversy in the industry?
  • Will adding videos, attention-grabbing images, or infographics to your idea make it stickier?
  • How can you easily reach out to industry influencers and ask them to share your content?
Don’t forget that great content marketing strategy with positive recipes will perform much better online. If you can continually stimulate positive emotions from your content, people will naturally be attracted to you.
You don’t have to reinvent the wheel here. Just identify good writers, authority bloggers, and leading marketers in your niche who seem to dominate the entire market with their content. Study them and use their formulas to craft your own engaging content.

2. Write In-Depth Articles
No matter how good you are at content promotion, if your content suck, you’re not going anywhere. Basically, for your content promotion strategies to yield a really positive result, your content must be epic.
This is the type of content that both Google and your potential clients will love.
What you need to do is research your topic thoroughly and make sure that you cover everything with precision and detail.
This type of article is usually over 2,000 words.
According to serpIQ, articles that contain 2,000 words or more tend to perform better on search engines:
Average content length of top 10 results

Therefore, by continuously publishing irresistible, thought-provoking, and in-depth articles, you will be able to attract not only more search traffic, but also more social shares.

Average Shares by content length

From the two charts above, you will see that long-form content converts better than short-form content. To back up this claim, a recent study performed by Marketing Experiments shows that on their homepage, long-form content outperformed short-form content by 30% in terms of conversions.
For you to be able to craft this type of content, do the following:
  • Pick a broad subject – e.g. email marketing, blogging, web traffic – then write about it in-depth.
  • Always target a long tail keyword in your title – e.g. how to make money as an affiliate blogger.
  • Extensively research current and accurate data and statistics to back up your claims.
  • Create interesting, engaging, entertaining, and educational content on the subject.
  • Include relevant graphics, videos, or slide presentations.
  • Link out to competent authority blogs.
  • Add a call-to-action (CTA).
3. Make Your Headlines Irresistible

Without a good headline, even the most comprehensive content will be ignored. Your headline is one of the most important aspects of your content.
If you wish to grab your audience’s attention, then you must learn how to craft attention grabbing and enchanting headlines. This is because you have only about 8 seconds to either keep or lose them to your competitors.

It’s no wonder that the experts say you should spend the same amount of time writing your content as you do writing your headline.
Writing magnetic headlines will not only bring you more visitors and potential clients, but it will always keep them coming back to your site.
Useful Resource:

4. Use Advanced Guest Posting
Basically, there are two ways to build a blog audience via content marketing:
  • Writing excellent articles on your own blog and getting important people to know about it.
  • Publishing quality-filled content on other relevant blogs in your niche.
Whichever you choose, what matters most is that you’re delivering value to people and thereby converting them into fans and customers.
However, while guest posting can help you build quality links from authority blogs, don’t make link building your primary focus; instead, use it to build a relationship and attract targeted visitors to your site who you will eventually convert to clients.
That was how the guys at GrooveHQ were able to reach over 1,000,000 people within their first year of blogging
.


The best guest blogging strategy is to use it to build your audience and not to get links to boost your search ranking. Believe me, if everything is done properly, the links will naturally come without you asking for them.
Follow the steps below to improve your guest blogging tactics for better traffic and exposure:
Step 1. Search for relevant blogs in your niche.
By “relevant blogs”, I mean the blogs that already attract your ideal audience. To do this, simply go to Google and do some research – e.g. if you’re into social media marketing, you could search for the keyword “beginner’s guide to social media marketing”:

Search for relevant blogs in your niche

Now that you already know the blogs that attract the type of audience you’re looking for, let’s go to the next step.

Step 2. Analyze the site’s social influence.
The fact that a web page ranks high on Google does not mean that it will drive lots of traffic to your blog.
You need to find out how many people are likely going to share your post on Facebook, Linkedin, Twitter, Pinterest, etc.
To figure this out, input the blog’s URL into the Buzzsumo search field and discover the number of social shares their recent blog posts gathered. Let’s do this with one of the blogs we got earlier “business2community.com”:

Analyze the site's social influence

From this research, you can see that the blog posts published on business2community.com for the past six months attracted over 70,000 social shares. Isn’t that terrific?
This tells you that if you’re able to land a guest posting opportunity here, you should be able to drive loads of traffic back to your site. Not only that, but you will also gain authority links and a bunch of social shares.

Now that you’ve analyzed the site, the next thing you should do is dig into the website’s archive for some of their older posts related to your topic. Once you’ve found one that was well received by that site’s audience, hack it, and craft an even more detailed article covering the same subject.
Here, you want to make the headline really attractive and enchanting, and follow the points we’ve already made above to write the article. Ensure that it’s better than what’s already published on their site.
After you’re done writing the content, contact the blog owner and let them know about the post. If they accept it, the next thing you should do is to send outreach emails to other influencers who will help to promote the post.

5. Rinse and Repeat
You don’t want to apply these tactics once and start sleeping. While you are able to get a good amount of traffic if done well, you should always strive for me.
You want to keep on doing this until you’re tired of getting traffic to your blog (which I doubt you ever will be). The best approach to growing any business both online and offline is to keep on doing what works for you.
The more epic content you write and the more popular blogs you write for, the more exposure you get, the more traffic you’ll be able to drive back to your site, the more friends you’ll make, and the more money you stand to earn.

Therefore, once you’re able to publish an article on one popular site following the steps above, rinse and repeat the process for even more traffic and clients.

Conclusion
There are many ways you can attract more website traffic, and the best way is to try to do what works for others and see if it can have any results for you.
The strategies I’ve shared here are what have worked for many people, and I’m sure they will equally work for you, too.

Just make sure that when you are applying these techniques, you are paying careful attention to performing the process properly. If you do, you’ll notice that everything starts to work out just fine.
When you start to get more traffic, you can convert these visitors into clients and customers. That’s when the real magic of blogging takes hold.


What are some of the things you do to drive more traffic to your blog? How do you attract more clients? Let’s hear your thoughts in the comments below!
Like this post? Share it with your friends!

The Ultimate Guide To Writing The Perfect Privacy Policy For Your Blog

The Ultimate Guide To Writing The Perfect Privacy Policy For Your Blog
Writing Privacy Policy For Blog
Do you have a blog/website without a privay page? Well, if your answer is yes; you might be leading yourself into a bigger problem.
If you are a blogger, it is mandatory that you write a privacy policy for your blog. This is a way to show the uniqueness of your blog aside from some other significant benefits that are attached to it.


Firstly, let me explain what a privacy policy is…

What is a Privacy Policy?

According to Wikipedia, “A privacy policy is a statement or a legal document (in privacy law) that discloses some or all of the ways a party gathers, uses, discloses, and manages a customer or client’s data. It fulfills a legal requirement to protect a customer or client’s privacy. Personal information can be anything that can be used to identify an individual, not limited to but including name, address, date of birth, marital status, contact information, ID issue and expiry date, financial records, credit information, medical history, where one travels, and intentions to acquire goods and services. In the case of a business, it is often a statement that declares a party’s policy on how it collects, stores, and releases personal information it collects. It informs the client what specific information is collected, and whether it is kept confidential, shared with partners, or sold to other firms or enterprises.”
I bet you might be thinking that this is not for you, but before you run away, I would like you to keep paying attention.
Why?
Because writing a good privacy policy will cost you next to nothing, and it will save you from a lot of problems later on.
Let’s consider some of the reasons why you need to write a functional and relevant privacy policy on your blog.

The Benefits of a Privacy Policy Page For Your Blog

Some of the advantages of a well-written privacy policy:
  • It makes your readers trust you: The increase in cybercrime has led to an increasing fear of releasing personal information on the internet. Users should know why you need their personal data & how you planning to use it. If you have a good privacy policy written on your blog, it will diffuse any fears as you are bound by the content of that policy.
  • It saves you from lawsuits: Since your privacy policy reflects the principle of your blog, you will find it handy when some consumers want to slam a lawsuit on you even when they are at fault due to their own ignorance. The content of your policy will bail you out of such predicaments as it will serve as a witness to your innocence. If, however, you don’t have one, you may have to face tons of lawsuits. Note: To take advantage of this protection, ensure you abide by the privacy policy, as failure to do so will provide a significant loophole for people to exploit.
While the benefits of having a good privacy policy will help you secure your business, its absence will have the opposite effect.

The Ultimate Guide To Crafting A Meaningful Privacy Policy

Crafting A Meaningful Privacy Policy
An active privacy policy is one that is easily understood by your readers with pieces of information that are neither ambiguous nor confusing.
  • It should be written in simple English: Ease of understanding is one of the best qualities of a good privacy policy. It should be simple enough for all visitors to read and comprehend. If, on the other hand, your privacy policy is full of jargon that visitors find difficult to understand, they may log out of your blog and look for an alternative blog with a straightforward and easy-to-read privacy policy.
  • The type of information collected: Your customer should have an idea of the kind of information you want to collect from them. If you collect their personal information (credit card numbers, cookies, email addresses, etc.), let this be explicitly specified in your privacy policy.
  • How the information will be used: You don’t need to keep your customers in the dark regarding how you want to use any collected information. If you must share their information with third parties, clearly say so. Customers should never be left guessing.
  • Include the relevant laws you abide by: There may be federal and/or state privacy laws that govern your practices. If you comply with these regulations, include that information.
  • It may be updated: Some circumstances may demand that you update your privacy policy to remain in business. Let your customers know that any information is subject to change at any time.
  • Analytics and Google privacy requirement: If you earn money via AdSense, don’t forget to add this information in your privacy policy. Likewise, if you use Analytics, Google will frown upon you if your privacy policy information isn’t in the right place.
  • How to opt-out: Sometime in the future, a customer may decide to opt out of your services; your privacy policy should make a provision for that.
  • The effective date: You should include when this policy will start to take effect (i.e. effective immediately or at a future point in time). Apart from including the effective date, you must also include how customers will be notified if you make any changes to this policy.

The Various Privacy Policies That You Need

Many policies may be included in your blog. While you may not need all of them, you probably need to include at least these two
:
1. AdSense Privacy Policy
AdSense Privacy Policy

As a blogger, you probably want to earn some income from the popular Google Adsense program. To qualify for this, Google needs to see an AdSense privacy policy on your website. According to Google AdSense:
“You will ensure that at all times you use the services, the properties have a clearly labeled and easily accessible privacy policy that provides end users with clear and comprehensive information about cookies, device-specific information, location information and other information stored on, accessed on, or collected from end users’ devices in connection with the Services, including, as a Private Policy applicable, information about end users’ options for cookie management.”
You must abide by this rule because when you signed up for AdSense, you accepted their terms and conditions.
Failing to do this will disqualify you from using AdSense.
2. Analytics Privacy Policy
If you have Google Analytics on your blog, it is required that you have a privacy policy on it.
According to Google:
“You will have and abide by an appropriate privacy policy and will comply with all applicable laws relating to the collection of information from visitors to your websites. You must post a Privacy Policy, and that policy must provide notice of your use of a cookie that collects anonymous traffic data.”
Google is not suggesting the use of a privacy policy; rather, the company makes it mandatory to have one.
If you have been using Google Analytics on your blog without a privacy policy, you should make one before Google finds out and penalizes you.
Do you need assistance?
Due to the nature of the information that an effective privacy policy should contain, some people may find it difficult coming up with a policy that meets the necessary requirements.
If you find yourself in such a situation, there is a way out:
  • Use a third party privacy policy generator.
Here are two:
  1. FreePrivacyPolicy.com: This company offers a free writing service that can help you get the best privacy policy in about 15 minutes (for free).
  2. TrustGuard.com: This is another simple and quick generator.

Conclusion

A good privacy policy on your blog is a way to show your customers that you are dedicated to the values that are beneficial to them, such as honesty and transparency.
These virtues will automatically help you build a great relationship with your customers.
You stand a chance of increasing your customer base with the right privacy policy as well as protecting your business from being used as an avenue for fraudulent practices.
Now it’s your turn to let me know: Do you have a privacy policy on your blog? If not, are you going to write one? Let me hear your thoughts in the comments below!
Like this post? Don’t forget to share it!

Friday, 4 August 2017

Top 6 Tips for Becoming a Successful Blogger

Top 6 Tips for Becoming a Successful Blogger
6 Tips for Becoming a Successful Blogger

Being a Blogger is easy, all your need to do is start a new Blog and start writing. Simple is int it? But have you ever thought what it takes to become a successful Blogger? How Bloggers make thousands of dollars every month? Well, answer is dedication, passion and most important they are serious about Blogging.

Lots of people try to earn money online but very few gets success. One of the best ways of earning online is blogging. Blogging is one of the best career opportunity these days. Blogging needs lots of hard work, research and long working hours. But one thing came into my mind can everyone get success in Blogging? If yes, why still many bloggers fail and give up their Blogging. Why many blogs get into parked page after a year and many people, don’t even bother renewing their Blog? The answer is the lack of passion and motivation.


What is takes to become a Success ful Blogger?

1. You have  writing skills:-
If you have great writing skills, you can become a successful blogger. Writing is the basic skill for becoming a blogger. Your blog readership will depend on how good your writing skills are. When I’m talking about writing, it doesn’t mean writing like an expert, but write like an individual. You are not writing for a book or a newspaper, as they are different. See the editorial page of a newspaper or a magazine, and that’s the exact kind of writing which I’m talking about.


2. You are disciplined:-

Although every work or profession needs to be disciplined but a blogger should be more disciplined. A blogger should work according to a time-table. It should divide into writing posts, commenting on other blogs and social networking promotion. If you want loyal readers, then you have to post regularly on your blog. If you do not blog regularly, then you will lose your readers.


3. You are willing to learn:-

A blogger should always be ready to learn. I m still a learner. I read a lot of other blogs to gain more knowledge. Mostly bloggers share their experiences so that others can learn from them. So do spend some time to read other blogs so that you can increase your knowledge. I’m sure you are one of those who are willing to learn, and that’s why you are here. But even you achieve few goals and get initial success, don’t quit reading. Reading is an essential requirement which will help you to stay updated with the latest information.

4. You are good communicator:-
You can become a successful blogger if you are a good communicator. Some people think that a blogger’s work is over after writing the article. But they are wrong. The main work starts after the completion of the article. A blogger needs to promote that article on social networking sites and then he should also reply to all the comments he got on his article. You need a good communication skills for this. So improve your communication skills if you want to become a successful blogger.

5. You are willing to work hard:-
We have discussed earlier that hard work is the basis for becoming the successful blogger. A blogger has to work day and night to find new ideas and then he has to active on all the social networking sites to promote his blog. You don’t have to stress yourself with too much of work, rather use your time smartly and delegate time-consuming work to your virtual staff.

6. You are a creative person:-
It’s not necessary that every blogger should be a creative person, but it’s certainly an advantage for you. Creativity is one the most important part of writing. Creative articles always attract the attention of readers. It helps you to stand out from the rest.

Bonus: 7) You don’t make stupid mistakes:

Excuse me for my word, but I know as a newbie Blogger, we all make mistakes, and we learn from it. But the real deal is instead of making mistakes, learn from mistakes made by others which will help you to avoid those silly mistakes. Here are few articles, which will guide you few of the stupid mistakes a newBie blogger makes:

Best Elements Effective Blog

Best Elements Effective Blog
in order to be successful. It occurred to me that people just starting out often need guidance in the areas that that I oftenoverlook or dismiss as common knowledge, so I wrote this article in an effort to offer more well-rounded advice. After yet another year of living and learning, I havesome new things that I feel should be added to this list.

1. A Regularly Updated Website

This goes hand-in-hand with engaging and relevant content, you need to stick to a regular posting schedule so that your readers have access to new content on a regular basis. If you post sporadically, your readers won’t be able to keep track of your blog and will most likely lose interest altogether. When you don’t update your blog, it looks like it’s been abandoned and readers begin to distrust the relevance of the information that it contains. Ultimately, your readers aren’t there to learn about you, they are there because of what your content means to them. Simply put, if you want to blog, then you have to blog! Keep your content fresh (up-to-date) and engaging if you are serious about blogging and generating a following.

2. A Fast and Reliable User Experience

That being said, you can have fantastic content, but if your site is slower to load than molasses in winter, you will have your visitors abandoning your page at lighting speed. Visitors to your site aren’t taking a leisurely walk through the digital landscape; your visitors are looking for specific content that meets an immediate need. If they have to wait for over just 20 seconds for your site to load, they will assume that your site can’t meet their needs and move on to another site that can. If you are having problems with loading speed, consider paring down your images and compressing your website code to help it load faster. If your aren’t sure about your website speed, run it through the free Google PageSpeed Insights tool in order to see how well Google rates your site speed performance.

3. Giveaways to Email List Subscribers

Even with good content and a good loading speed, getting people to return is the biggest struggle for any blogger. One of the best ways to keep your blog from the out-of-sight-out-of-mind curse is to develop an email list allowing you to inform readers of updated content. We mentioned in the last article that you should have a newsletter opt-in form; however, asking people to join your email list to receive a newsletter isn’t always the most effective method anymore. Unless people really like your blog and want to be updated on all new posts, they usually won’t follow or sign up for a newsletter. So in order to actually secure this audience and get them on your email list, it often helps to offer some kind of giveaway to your email subscribers. Like with anything, when people are asked to give something out, they want to know what’s in it for them in return. Your subscribers are giving you their email addresses, so they want to be sure that it is worthwhile. Offering a free e-book, some tips and advice, or the like are all ways to answer that “what’s in it for me” question. If you begin to implement some kind of giveaway, you will see your email subscribers increase.
Of course it goes without saying that any communication through an email list needs to be conducted using a professional email account. A basic yahoo or gmail account is a lot less professional and reassuring than an email address which matches the domain name of your blog or website. Usually your readers will be more than happy to communicate with you if they feel that they can trust the source of the emails that they are getting. If they have to second guess where this email is from, your newsletter will likely end up in spam or they will block your correspondence entirely, dropping off of that very precious email list that you are trying so hard to create.

4. Ability to Comment and Interact

Speaking of communication, your dedicated followers are going to want to be able to communicate or interact on your website. Whether this is in the form of a comments section at the end of every blog post or a formal forum that is included in your website, when people enjoy or even have a problem with something that they have read, they often want to say something about it. Furthermore, not only does this keep your readers happy, but it also works to prove the authority of your blog. If you came across a blog with absolutely no comments or followers, you would most likely assume that no one is reading that blog. In order for browsing readers and the search engine to consider your blog worthwhile – yes that’s right, Google loves social interaction and rankscontent that has received comments in the relevancy and ranking scores – you need to generate some kind of interaction on your blog or website. And of course don’t forget to respond to comments and questions! You will lose readers very quickly if they are trying to communicate with you and you aren’t responding to their enquiries. Responding quickly shows that you care that people are reading your blog and that you care about your blog in general

Thursday, 3 August 2017

Problem Solved!! Recent Post, Featured Post, Slider, Random Post, Related Post Not Working


We have more than 200+ templates in our directory and we are the best blogger template provider in the world the class and elegance of our templates are way higher than any other blogger template designer site, we have a huge variety of templates for different niches. Our templates are perfectly coded and well optimized to perform better and bug free but some times things as we planed, our templates has variety of widgets which work on scripts like, Recent Posts widget, Random Post widget, Slider, carousel, Label Specific Featured Post Widget, Related Post Widget, Most comment Widget, recent Comment Widget etc.Sometimes they don't work because a user hasn't followed the documentation as carefully as we want to.
After installing the theme, this it the minimum setting to make all widget works fine in this themes.


Step 1 - Mobile Blogger Template


This to make the blogger customizer work
  1. On Blogger Dashboard Click Template.
  2. Click Gear icon below mobile template
  3. In pop up box choose No. Show desktop template on mobile devices.
  4. Then Click Save.

Step 2 - Embedded Comment


This to make comment area like the Demo.
  1. On Blogger Dashboard Click Setting.
  2. Click Posts and Comments
  3. in Comment Location Choose Embedded
  4. Then Click Save settings.

Step 3 - Blog Feed


This to make recent comment, Search Result, Featured Post, and Post by Label work fine
  1. On Blogger Dashboard Click Setting.
  2. Click Other
  3. In Site Feed Allow Blog Feed Choose Full Or Short
  4. Then Click Save settings.
  • Note :-
  1. If yours post have image uploaded on blogspot you can choose SHORT. but if yours post just have image from third party image hosting you must choose Full
  2. Blogger feed must be not redirect to other feed site like Feedburner
  3. Your's blog or website not Private.


Step 4 - Date Setting 


This to make time stamp like the Demo.
  1. On Blogger Dashboard Click Setting.
  2. Click Language and Formatting
  3. Modify the date and time format according to your need.
  4. Then Click Save settings.

Note - Labels


  • To make the content based widget(Recent Post, Random Post) work please add atleast one label name to every post. 
  • Labels are case sensitive so remember one thing while adding any label to your widgets that always add the label names same as you have added into the posts. 
  • If your label has Space between two words then don't put the label same at it you must fill the same with %20, for example Blogger%20Tips.

Conclusion

Congrats !! You have made it. now you have learned the solution to fix the widget problems as your own. Visit your blog and check the awesome widgets live in action, hope you liked this tutorial, if you enjoyed then please share it with your friends, we are working hard to develop more such awesome widgets please stay tuned with Us. 再见 !! (Goodbye in Chinese).

Best 8 Most beautiful recent post Widgets/Gadgets for blogger

Best 8 Most beautiful recent post Widgets/Gadgets for blogger
Recent post widget is real important for every blogger and reader.  There can be several benefits of it such as showing your latest posts to the visitors and thus getting more views. Recent post widget is a great way to keep your visitors browsing more and more articles on your blog and thus lowering website bounce rate.  Such great features make it important to add an attractive recent post widget to attract a lot of visitors and make them click.
Although blogger provides its own default recent post widget but its too simple and unattractive  that everyone would consider using third party widget . There are several attractive colorful recent post widgets available on the internet  , you should add which is most suitable to niche of your blog . Some of widget contains third party javascripts  and may reduce loading speed of your blog  so you need to choose the one wisely .

 How to add recent post widget to your blog

  • Log into your blogger dashboard >>  go to Layout >>  and click on Add a gadget
add a widget to blogger
  • A window will pop-up , scroll down and choose HTML/Javascript 
add a widget to blogger
  • A box will open , Copy the code of recent post widget that you want to add to your blog and paste the code into the box
  • Customize the widget according to your requirements and save and you are done.

Here are the codes for  8  beautiful and colorful recent posts widgets  and the good thing about these is you can customize color, fonts and every other thing that suits your blog. If you are getting any problem with customization or coding , comment below , I will reply.

1.      recent post widget

<script style="text/javascript"  src="http://makingdifferent.github.io/blogger-widgets/recent-posts-widget2.js"></script>
<script style="text/javascript">
var posts_no = 5;
var showpoststhumbs = true;
var readmorelink = true;
var showcommentslink = false;
var posts_date = true;
var post_summary = true;
var summary_chars = 70;
</script>
<script  src="feeds/posts/default?orderby=published&alt=json-in-script&callback=showlatestpostswiththumbs"></script>

<noscript>Your browser does not support JavaScript!</noscript>
<link href='http://fonts.googleapis.com/css?family=Ubuntu+Condensed' rel='stylesheet' type='text/css' />
<style type="text/css">
img.recent-post-thumb {width:50px;height:50px;float:right;margin: 5px  -5px 0px 0px; border-radius: 100%; padding: 3px;background: #fff}
.recent-posts-container {font-family: 'Ubuntu Condensed', sans-serif;  float: left;width: 100%;min-height: 55px;margin: 5px 0px 5px  0px;padding: 0;font-size:12px;}
ul.recent-posts-container {list-style-type: none; background: #fff;padding: 0px; }
ul.recent-posts-container li:nth-child(1n+0) {background: #F49A9A; width: 100%}
ul.recent-posts-container li:nth-child(2n+0) {background: #FCD092; width: 95%}
ul.recent-posts-container li:nth-child(3n+0) {background: #FFF59E; width: 90%;}
ul.recent-posts-container li:nth-child(4n+0) {background: #E1EFA0; width: 85%;}
ul.recent-posts-container li:nth-child(5n+0) {background: #B1DAEF; width: 80%;}
ul.recent-posts-container li {padding:5px 10px;min-height:50px; list-style-type: none; margin: 0px 5px -5px 5px; color: #777;}
.recent-posts-container a { text-decoration:none; }
.recent-posts-container a:hover { color: #222;}
.post-date {color:#e0c0c6; font-size: 11px; }
.recent-post-title a {font-size: 14px;color: #444; font-weight: bold;}
.recent-post-title {padding: 6px 0px;}
.recent-posts-details a{ color: #222;}
.recent-posts-details {padding: 5px 0px 5px; }
</style>

2.

beautiful and colorful recent post widget

<script style="text/javascript"  src="http://makingdifferent.github.io/blogger-widgets/recent-posts-widget2.js"></script>
<script style="text/javascript">
var posts_no = 5;
var showpoststhumbs = true;
var readmorelink = true;
var showcommentslink = true;
var posts_date = true;
</script>
<script  src="/feeds/posts/default?orderby=published&alt=json-in-script&callback=showlatestpostswiththumbs"   rel="nofollow"></script>

<noscript>Your browser does not support JavaScript!</noscript>
<link href='http://fonts.googleapis.com/css?family=Lobster|Gloria+Hallelujah' rel='stylesheet' type='text/css' />
<style type="text/css">
img.recent-post-thumb {width:50px;height:50px;float:right;margin: -4px  -35px 0px 0px; border: 4px solid #FCD6CB; border-radius: 100%;}
.recent-posts-container {font-family: 'Gloria Hallelujah', cursive;   float: left;width: 100%;min-height: 55px;margin: 5px 0px 5px  0px;padding: 0;font-size:12px;}
ul.recent-posts-container {counter-reset: countposts;list-style-type: none; background: #fff; }
ul.recent-posts-container li:before {content:  counter(countposts,decimal);counter-increment: countposts;z-index:  2;position:absolute; left: -20px; font-size: 16px;color:  #616662;background: #FCD6CB;padding: 9px 14px; border-radius: 100%;  margin-top: 15px;}
ul.recent-posts-container li {padding:5px 0px;min-height:50px;  list-style-type: none; margin: -2px 5px 5px 5px;  border-top: 2px solid  #FCD6CB;}
ul.recent-posts-container {border: 2px solid #FCD6CB; }
.recent-posts-container a { text-decoration:none; }
.recent-posts-container a:hover { color: #222;}
.post-date {color:#e0c0c6; font-size: 11px; }
.recent-post-title a {font-size: 14px;color: #616662;}
.recent-post-title {padding: 6px 0px;}
.recent-posts-details a{ color: #888;}
.recent-posts-details {padding-bottom: 5px;}
a.readmorelink {color: #4DACE3;}
</style>

3.beautiful recent post widget

<div class="recentpoststyle">
<script src="http://makingdifferent.github.io/blogger-widgets/recent-posts-widget2.js"></script>
<script>
var posts_no = 5;var posts_date = true;var post_summary = true;var summary_chars = 80;</script>
<script src="/feeds/posts/default?orderby=published&amp;alt=json-in-script&amp;callback=showlatestposts">

<noscript>Your browser does not support JavaScript!</noscript>
<style type="text/css">
.recentpoststyle {counter-reset: countposts;list-style-type: none;}
.recentpoststyle a {text-decoration: none; color: #49A8D1;}
.recentpoststyle a:hover {color: #000;}
.recentpoststyle li:before {content:  counter(countposts,decimal);counter-increment: countposts;float:  left;z-index: 2;position:relative;font-size: 20px;font-weight:  bold;color: #fff;background: #69B7E2; margin: 15px 5px 0px -6px;  padding: 0px 10px; border-radius: 100%;}
li.recent-post-title { padding: 5px 0px;}
.recent-post-title { font-family: "Avant Garde",Avantgarde,"Century Gothic",CenturyGothic,AppleGothic,sans-serif;}
.recent-post-title a {color: #444;font-size: 13px; text-decoration: none; padding: 2px; font-weight: bold;}
.post-date {padding: 5px 2px 5px 30px; font-size: 11px; color: #999; margin-bottom: 5px;}
.recent-post-summ { border-left: 1px solid #69B7E2; color: #777;  padding: 0px 5px 0px 20px; margin-left: 11px; font-family:  Garamond,Baskerville,"Baskerville Old Face","Hoefler Text","Times New  Roman",serif; font-size: 15px;}
</style></div>

4. beautiful recent post widget

<script style="text/javascript"  src="http://makingdifferent.github.io/blogger-widgets/recent-posts-widget2.js"></script>
<script style="text/javascript">
var posts_no = 5;
var showpoststhumbs = false;
var readmorelink = true;
var showcommentslink = true;
var posts_date = true;
</script>
<script  src="/feeds/posts/default?orderby=published&alt=json-in-script&callback=showlatestpostswiththumbs"></script>

<noscript>Your browser does not support JavaScript!</noscript>
<link href='http://fonts.googleapis.com/css?family=Oswald' rel='stylesheet' type='text/css'/>
<style type="text/css">
img.recent-post-thumb {padding: 2px;  width:35px;height:35px;float:right;margin: -14px 0px 0px 5px; border:  1px solid #cea5ac; border-radius: 10%;}
.recent-posts-container {font-family: 'Oswald', sans-serif;  float:  left;width: 100%;min-height: 70px;margin: 5px 0px 5px 0px;padding:  0;font-size:12px;}
ul.recent-posts-container li {padding:5px 0px;min-height:65px; list-style-type: none; margin: 0px 10px 5px 35px;}
ul.recent-posts-container {counter-reset: countposts;list-style-type: none;}
ul.recent-posts-container li:before {content:  counter(countposts,decimal);counter-increment: countposts;z-index:  2;position:absolute; left: 5px; font-size: 16px;color:  #4D4D4D;background: #F7F7F7;padding: 9px 14px; border: 1px solid  #efefef;}
.recent-posts-container a { text-decoration:none; }
.recent-posts-container a:hover{color: #4DACE3;}
.post-date {color:#e0c0c6; font-size: 11px; }
.recent-post-title a {font-size: 13px; text-transform: uppercase; color: #5C4D4D;}
.recent-post-title { margin: 5px 0px; }
.recent-posts-details {border-top: 4px solid #AC707A; margin-top: 5px; padding-top: 5px;}
.recent-posts-details a{ color: #888;}
a.readmorelink {color: #4DACE3;}
</style>

5.

recent post widget with thumbnail


<script style="text/javascript"  src="http://makingdifferent.github.io/blogger-widgets/recent-posts-widget2.js"></script>
<script style="text/javascript">
var posts_no = 5;
var showpoststhumbs = true;
var readmorelink = true;
var showcommentslink = true;
var posts_date = true;
var post_summary = true;
var summary_chars = 70;</script>
<script  src="/feeds/posts/default?orderby=published&alt=json-in-script&callback=showlatestpostswiththumbs"></script>

<noscript>Your browser does not support JavaScript!</noscript>
<link href='http://fonts.googleapis.com/css?family=Oswald' rel='stylesheet' type='text/css'/>
<style type="text/css">
img.recent-post-thumb  {padding:2px;width:65px;height:65px;float:left;margin: 0px 10px 10px;  background: #fff; border: 1px solid #69B7E2;}
.recent-posts-container {font-family: 'Oswald', sans-serif;  float:  left;width: 100%;min-height: 70px;margin: 5px 0px 5px 0px;padding:  0;font-size:12px;}
ul.recent-posts-container li {padding:5px 0px;min-height:65px; list-style-type: none; margin-bottom: 5px;}
ul.recent-posts-container {counter-reset: countposts;list-style-type: none;}
ul.recent-posts-container li:before {content:  counter(countposts,decimal);counter-increment: countposts;z-index:  2;position:absolute; left: 15px; font-size: 13px;font-weight:  bold;color: #fff;background: #69B7E2;padding: 4px 10px; border-radius:  100%;}
.recent-posts-container a { text-decoration:none; }
.recent-post-title a {font-size: 13px; text-transform: uppercase; color: #2aace3;}
.recent-posts-details {margin: 5px 0px 0px 92px; }
.recent-posts-details a{ color: #777;}
</style>

6. multicolor recent post widget

<script src="http://code.jquery.com/jquery-latest.min.js" type="text/javascript"></script><div id="recent-posts"><script language="JavaScript">
home_page = "Enter your blog url here";
numposts = 5;

imgr = new Array();showRandomImg = false;boxwidth = 255;cellspacing = 6;borderColor = "#232c35";bgTD = "#000000";thumbwidth = 0;thumbheight = 0;fntsize = 15;acolor = "#666";aBold = true;icon = " ";text = false;showPostDate = false;summaryPost = 0;summaryFontsize = 10;summaryColor = "#666";icon2 = " ";</script><script src="http://24work-new.googlecode.com/svn/trunk/24work-blogspot/recent-posts-t/recent-posts-min-1-ycode.js" type="text/javascript"/></script><link rel="stylesheet" type="text/css" href="http://24work-new.googlecode.com/svn/trunk/24work-blogspot/recent-posts-t/recent-posts-min-1.css" /></div>
Note: Replace the Enter your blog url here with your blog URL

7.

recent post widget

<script src="http://code.jquery.com/jquery-latest.min.js" type="text/javascript"></script><div id="recent-posts"><script language="JavaScript">
home_page = "Enter your blog url here";
numposts = 5;

imgr = new Array();showRandomImg = false;boxwidth = 255;cellspacing = 6;borderColor = "#232c35";bgTD = "#000000";thumbwidth = 0;thumbheight = 0;fntsize = 15;acolor = "#666";aBold = true;icon = " ";text = false;showPostDate = false;summaryPost = 0;summaryFontsize = 10;summaryColor = "#666";icon2 = " ";</script><script src="http://24work-new.googlecode.com/svn/trunk/24work-blogspot/recent-posts-t/recent-posts-min-1-ycode.js" type="text/javascript"/></script><link rel="stylesheet" type="text/css" href="http://24work-new.googlecode.com/svn/trunk/24work-blogspot/recent-posts-t/recent-posts-min-3.css" /></div>
Note: Replace the Enter your blog url here with your blog URL

8.recent post widget

<script src="http://code.jquery.com/jquery-latest.min.js" type="text/javascript"></script><div id="recent-posts"><script language="JavaScript">
home_page = "Enter your blog url here";
numposts = 5;

imgr = new Array();showRandomImg = false;boxwidth = 255;cellspacing = 6;borderColor = "#232c35";bgTD = "#000000";thumbwidth = 0;thumbheight = 0;fntsize = 15;acolor = "#666";aBold = true;icon = " ";text = false;showPostDate = false;summaryPost = 0;summaryFontsize = 10;summaryColor = "#666";icon2 = " ";</script><script src="http://24work-new.googlecode.com/svn/trunk/24work-blogspot/recent-posts-t/recent-posts-min-1-ycode.js" type="text/javascript"/></script><link rel="stylesheet" type="text/css" href="http://24work-new.googlecode.com/svn/trunk/24work-blogspot/recent-posts-t/recent-posts-min-4.css" /></div>
Note: Replace the Enter your blog url here with your blog URL